Appearance
Transition Opportunities: Player
The transition_opportunities_player section in the markings response contains one row per player per transition opportunity.
Overview
This data set provides player-level transition data with one row per on-court player.
It is designed to be able to help analyze how players are getting back in transition defense and how they are attacking in transition offense.
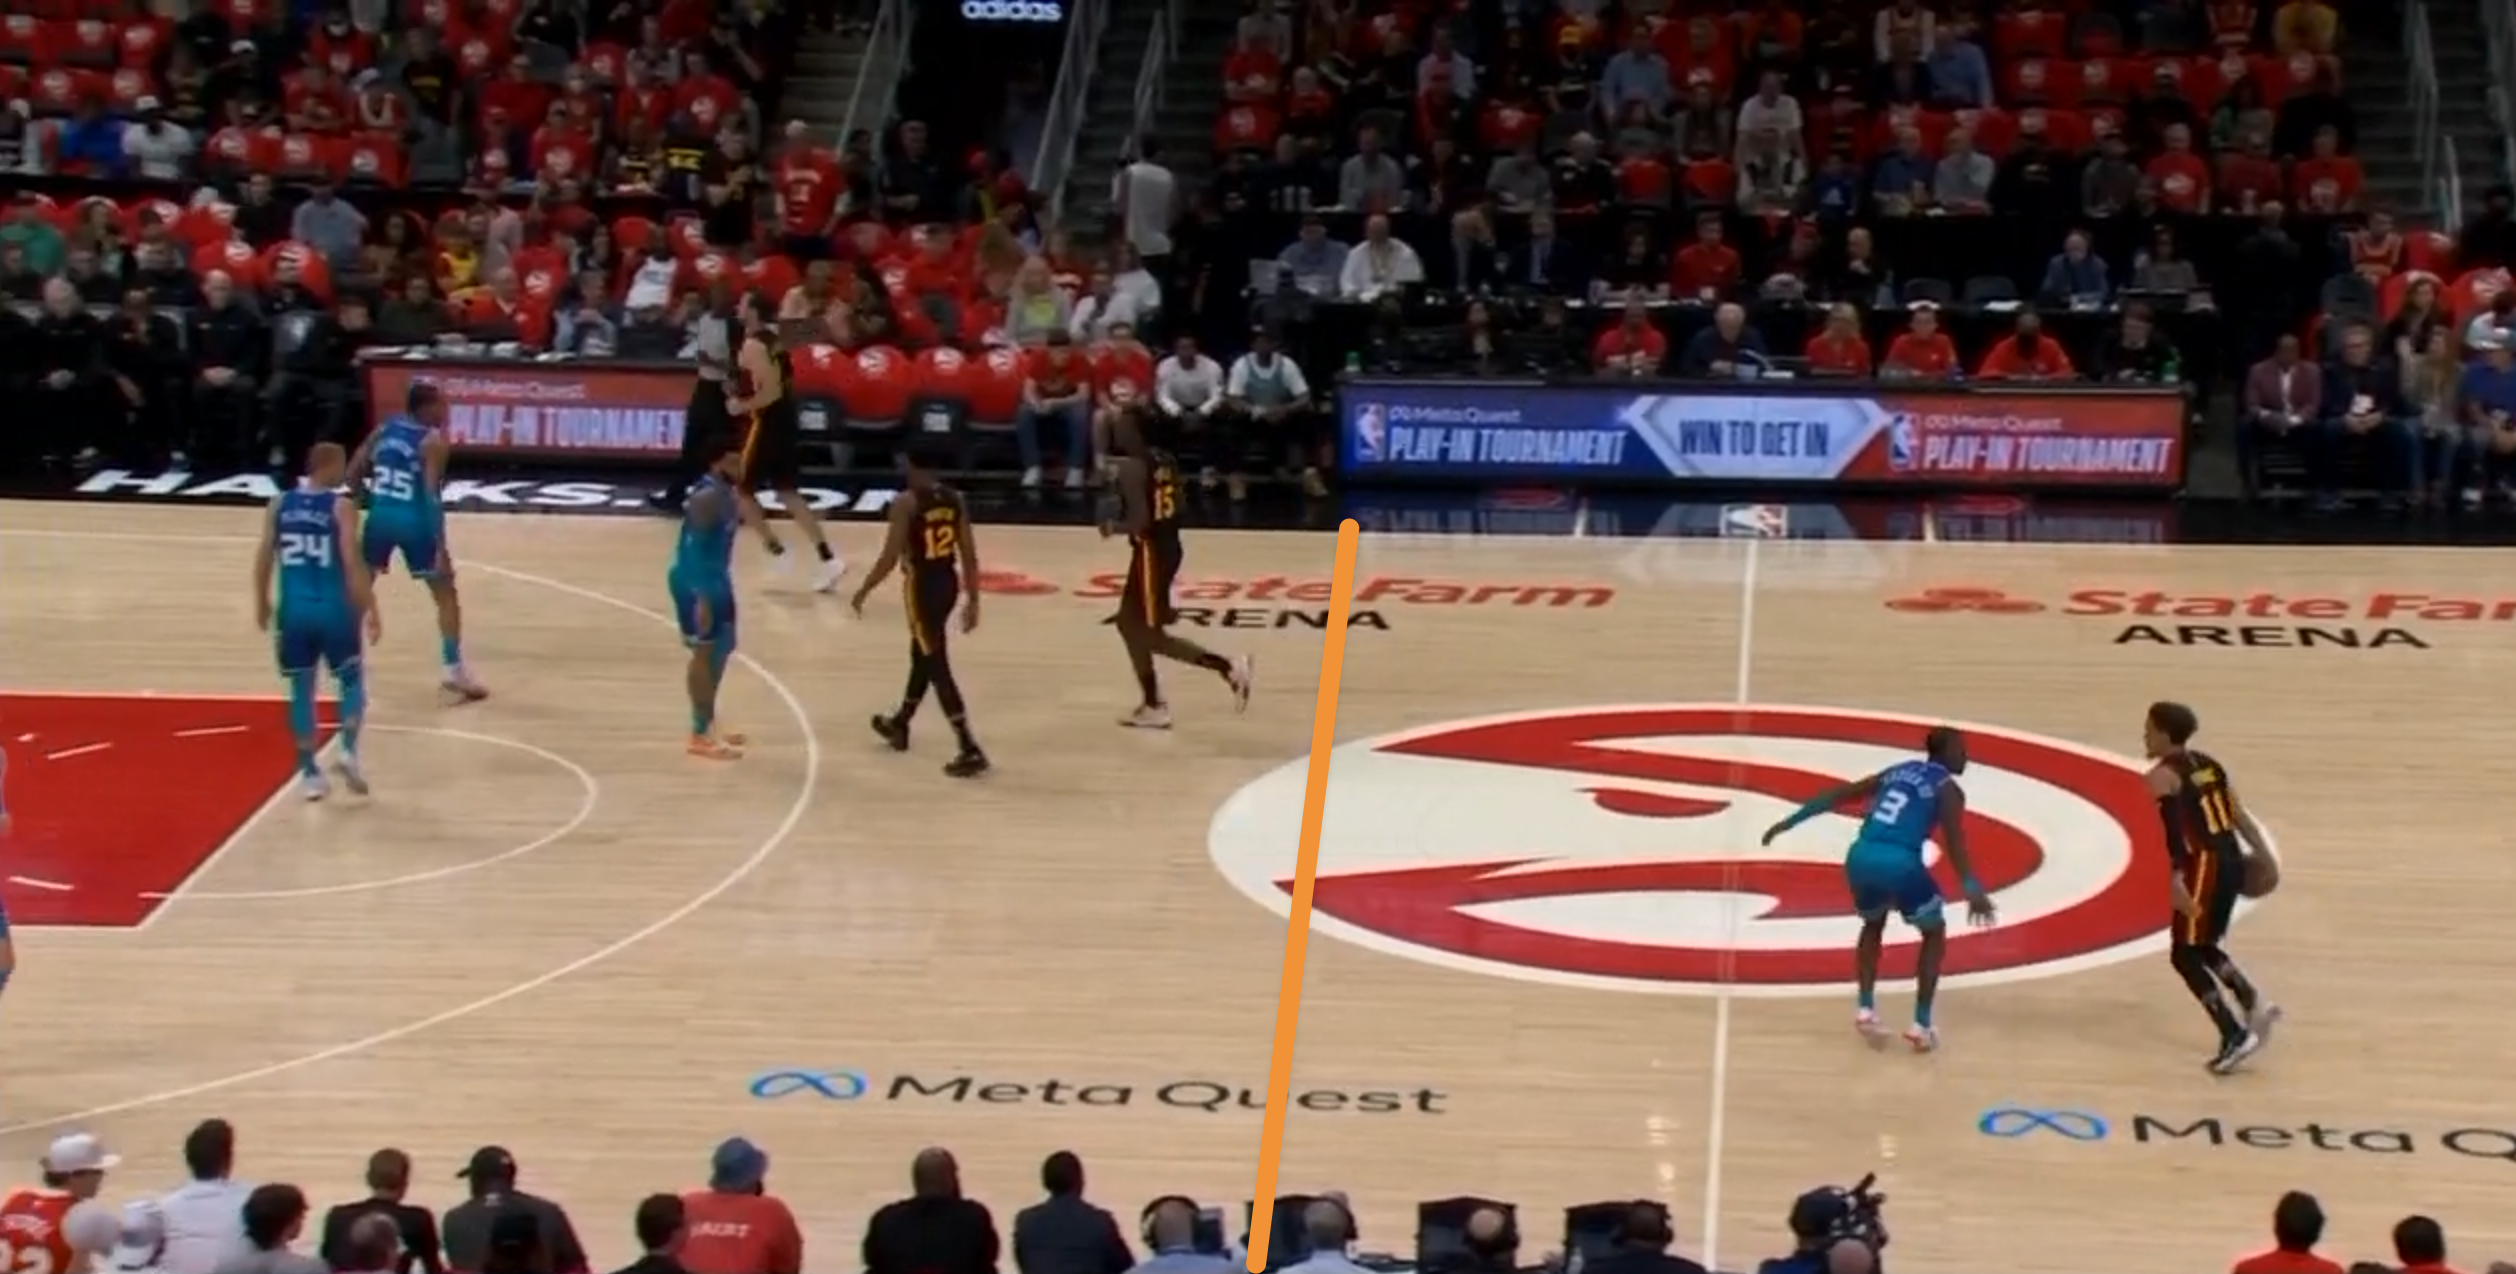
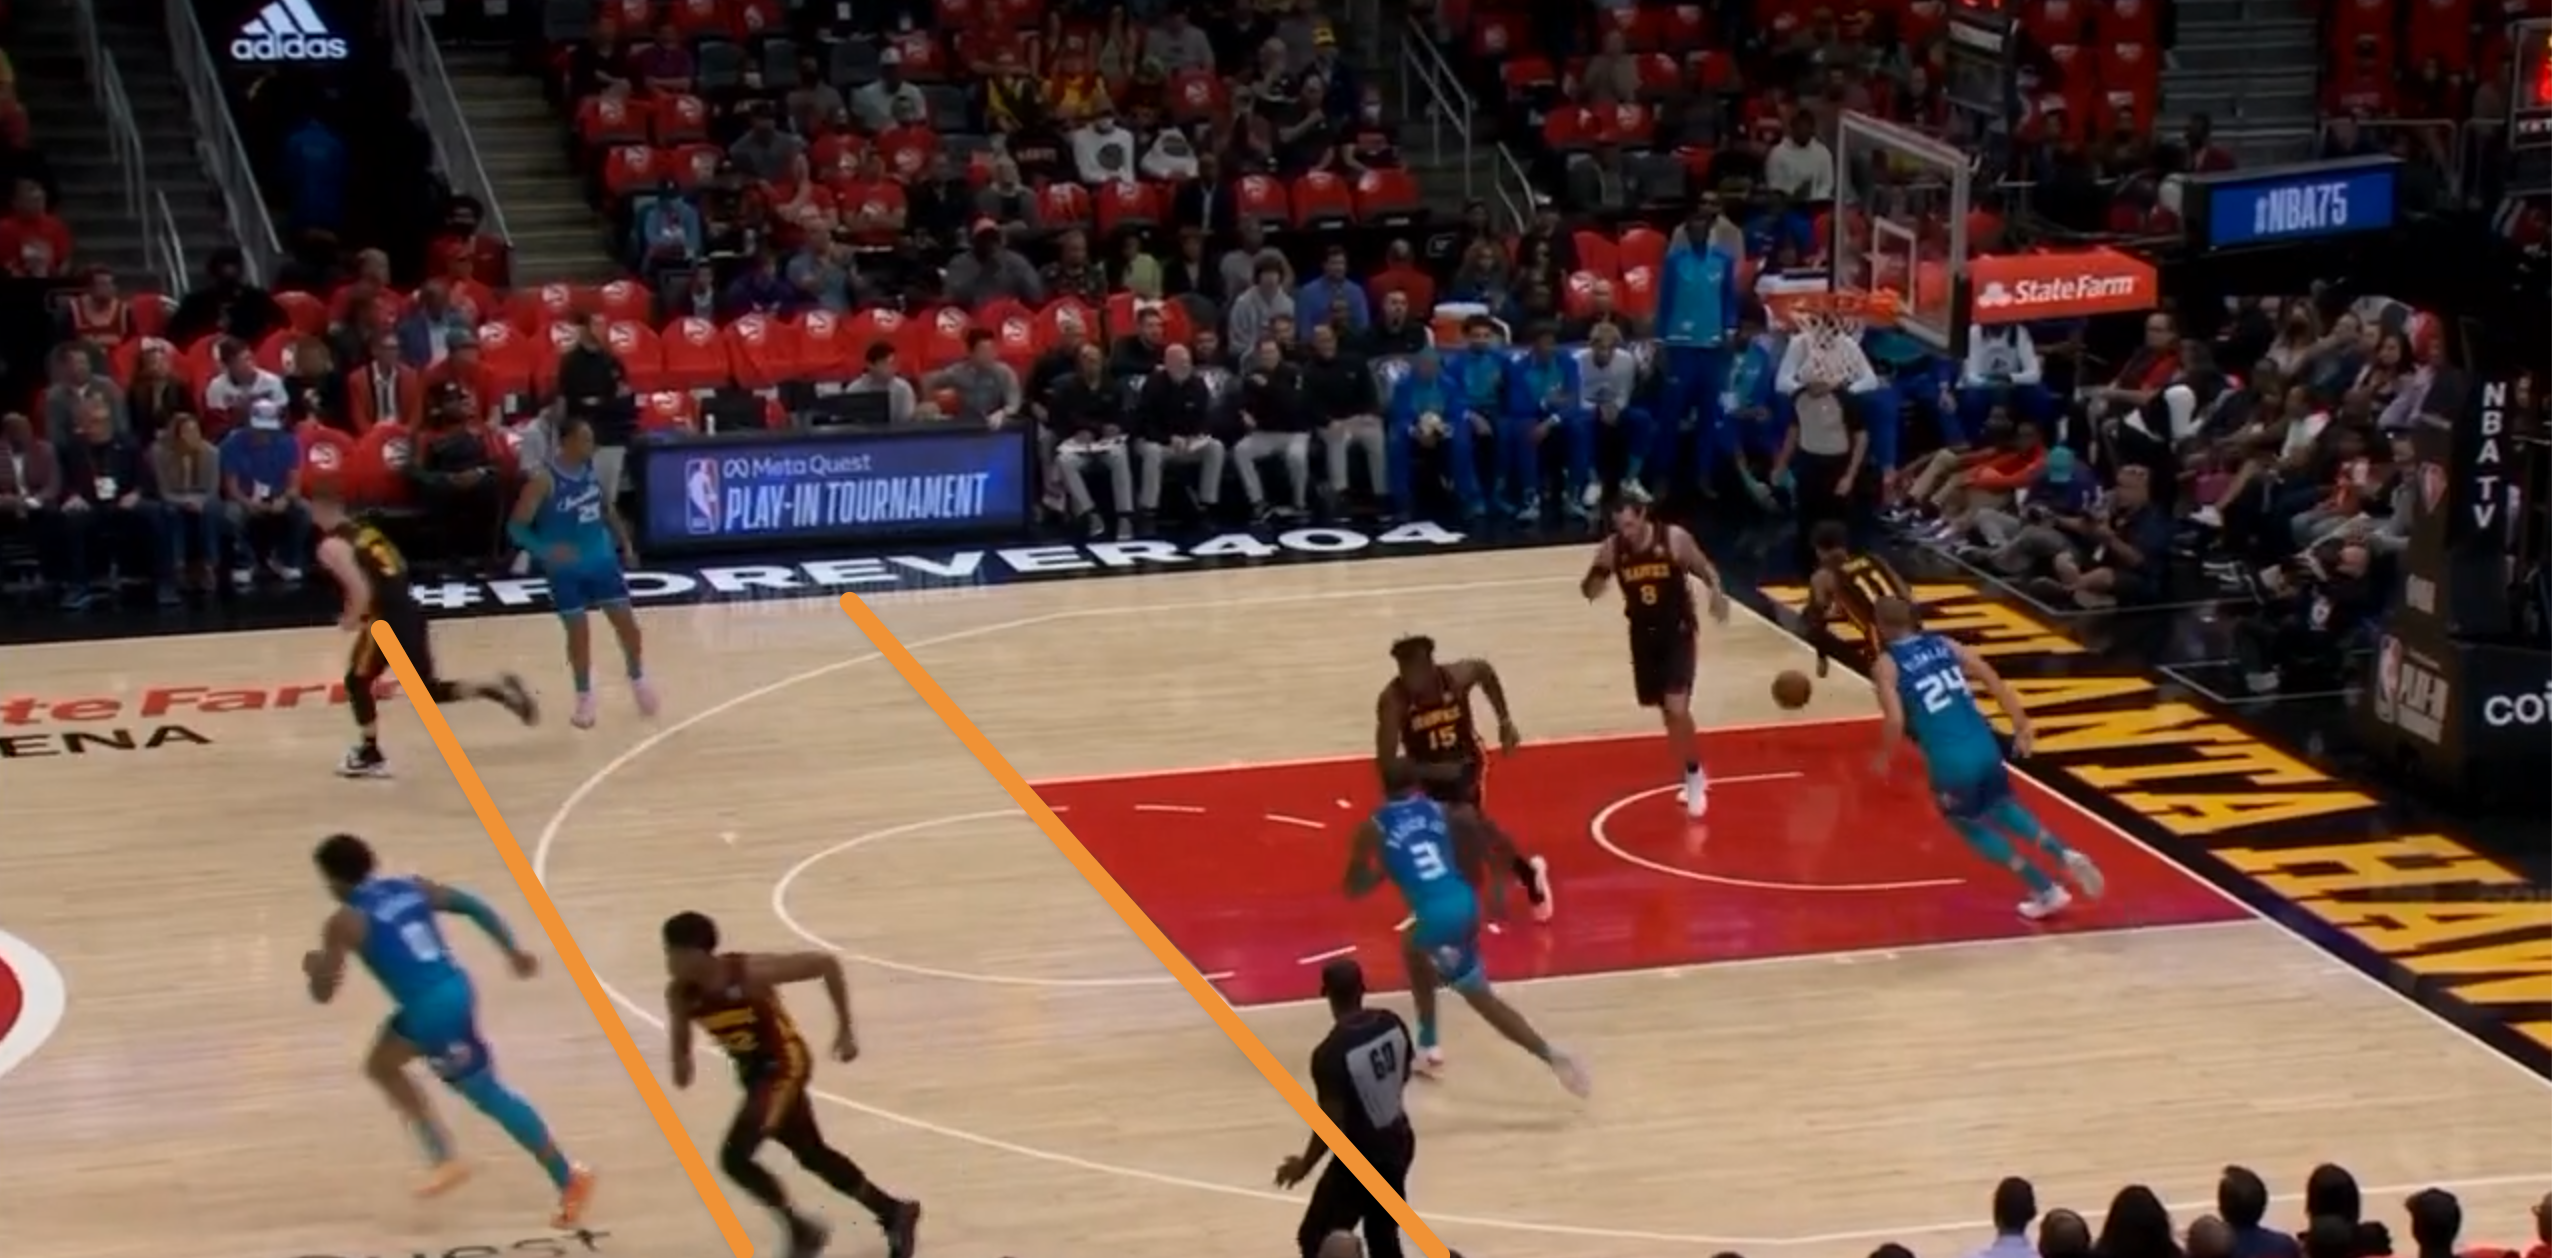
This data uses the concept of a "scoring zone", which is defined as anywhere inside of a line 8 feet past halfcourt. In the image below, everything closer to the basket than the orange line is inside the scoring zone:
Sample Response
json
{
  "markings": {
    "transition_opportunities_player": [
      {
        "chance_id_ctg": "chance_6dda4f792e347155bb8d20ab207d75bd",
        "crashed_on_previous_chance_end": null,
        "defensive_team_id_nba": 1610612740,
        "defender_pressing_score": null,
        "distance_to_scoring_zone_x": 39.74,
        "distance_traveled_between_previous_shot_start_and_chance_start": 6.28,
        "game_id_nba": "0022500404",
        "is_back_before_ball_crosses_scoring_zone": false,
        "is_back_before_ball_crosses_three_point_zone": false,
        "is_defender_pressing": null,
        "is_primary_initiator": true,
        "offensive_team_id_nba": 1610612742,
        "player_id_nba": 1630314,
        "player_ball_seconds_to_scoring_zone_diff": 0.0,
        "player_ball_seconds_to_three_point_zone_diff": -0.13,
        "player_start_area": "below_ft_extended",
        "season": 2025,
        "season_type": "regular season",
        "seconds_to_scoring_zone": 6.13,
        "seconds_to_scoring_zone_rank": 5,
        "seconds_to_three_point_zone": 10.83,
        "seconds_to_three_point_zone_rank": 5,
        "side": "offense",
        "speed_to_scoring_zone": 6.86,
        "speed_to_three_point_zone": 5.21,
        "team_id_nba": 1610612742,
        "transition_end_region": "far",
        "transition_end_x": 8.03725,
        "transition_end_y": 17.962333333333333,
        "transition_role": "primary_initiator",
        "was_rebounder_on_previous_chance": null,
        "was_shooter_on_previous_chance": false,
        "watched_on_previous_chance_end": false,
        "widest_y_between_scoring_zones": 18.95,
        "widest_y_between_three_point_zones": 21.66,
        "x_distance_traveled_between_shot_start_and_chance_start": -5.04
      }
    ]
  }
}
Fields
Identifiers
player_id_nba
Type: integer
NBA player ID
team_id_nba
Type: integer
NBA team ID
side
Type: string
Whether this player is on the offense or defense side
game_id_nba
Type: string
NBA game ID
chance_id_ctg
Type: string
CTG-generated chance ID
Context
season
Type: integer
Season year
season_type
Type: string
Season type (e.g. regular season, playoff)
offensive_team_id_nba
Type: integer
NBA team ID of the offensive team
defensive_team_id_nba
Type: integer
NBA team ID of the defensive team
Player Movement to Scoring Zone
player_start_area
Type: string
Where the player was on the court when the new offense started its transition. For most chances this is the same as the chance start. For chances that begin from a live-ball turnover, this is anchored at the new offensive team's first possession touch within the chance rather than the moment where the prior offense last touched the ball, so the player is marked based on where they were when the other team gained possession.
Values can be one of below_ft_extended (i.e. below the free throw line extended), between_ft_and_arc_extended (i.e. above the free throw line extended but below the top of the arc extended) or beyond_arc_extended (i.e. above the top of the arc extended).
distance_to_scoring_zone_x
Type: float | Unit: feet
How far the player is from the scoring zone, measured along the x-axis (i.e. baseline to baseline) when the new offense starts its transition. For chances that begin from a live-ball turnover, this is anchored at the new offensive team's first possession touch within the chance rather than the moment where the prior offense last touched the ball, so the player is marked based on where they were when the other team gained possession.
seconds_to_scoring_zone
Type: float | Unit: seconds | Nullable
How many seconds it took from when the offense started its transition for the player to reach the scoring zone. null if the player never reaches the scoring zone.
seconds_to_scoring_zone_rank
Type: integer | Nullable
Rank of this player among their teammates for seconds_to_scoring_zone (1 = fastest)
speed_to_scoring_zone
Type: float | Unit: feet/sec | Nullable
distance_to_scoring_zone_x / seconds_to_scoring_zone. null if the player never reaches the scoring zone, or if they are already in it when the new offense starts its transition (zero elapsed time).
is_back_before_ball_crosses_scoring_zone
Type: boolean | Nullable
true if the player reaches the scoring zone before the ball does. null if either the player or the ball never reaches the scoring zone during the chance.
player_ball_seconds_to_scoring_zone_diff
Type: float | Unit: seconds | Nullable
How many seconds ahead of (positive) or behind (negative) the ball the player was in reaching the scoring zone. ball_seconds_to_scoring_zone - seconds_to_scoring_zone. null if either the player or the ball never reaches the scoring zone.
widest_y_between_scoring_zones
Type: float | Unit: feet | Nullable
The widest y-coordinate this player reached while running between the two scoring zones. null if no scoring-zone-to-scoring-zone window is available for this player on the chance (e.g. the chance has no frontcourt_frame).
Player Movement to Three-Point Zone
is_back_before_ball_crosses_three_point_zone
Type: boolean | Nullable
true if the player reaches the three-point zone before the ball does. null if either the player or the ball never reaches the three-point zone during the chance.
speed_to_three_point_zone
Type: float | Unit: feet/sec | Nullable
Distance to the three-point zone / seconds_to_three_point_zone. null if the player never reaches the three-point zone, or if they are already past it when the new offense starts its transition (zero elapsed time).
widest_y_between_three_point_zones
Type: float | Unit: feet | Nullable
Same as widest_y_between_scoring_zones, except using the top of the 3pt arc extended. null under the same conditions (no per-frame aggregates between the three-point zones for this player).
seconds_to_three_point_zone
Type: float | Unit: seconds | Nullable
How many seconds it took from when the offense started its transition for the player to reach the three-point zone. null if the player never reaches the three-point zone.
seconds_to_three_point_zone_rank
Type: integer | Nullable
Rank of this player among their teammates for seconds_to_three_point_zone (1 = fastest)
player_ball_seconds_to_three_point_zone_diff
Type: float | Unit: seconds | Nullable
How many seconds ahead of (positive) or behind (negative) the ball the player was in reaching the three-point zone. ball_seconds_to_three_point_zone - seconds_to_three_point_zone. null if either the player or the ball never reaches the three-point zone.
Role & Initiative
is_primary_initiator
Type: boolean
true if this player is the primary ball handler initiating the transition. We mark a player as the primary initiator if they make a long pass upcourt or have possession of the ball longest before the ball enters the scoring zone.
transition_role
Type: string | Nullable
All offensive players are assigned a transition role based on their location and actions on the floor during the transition. This field is null if the player is on defense; if the player is already in the scoring zone before the chance starts (for example on a backcourt inbound); or if the player or ball never reach the frontcourt.
Possible values:
primary_initiator— this player is the primary transition initiator; same rules asis_primary_initiatorabove.rim_runner_ahead— the player was in front of the ball or close to it when the ball crossed into the scoring zone, ran down the middle of the court, and got close enough to the basket.rim_runner_trailer— the player ran down the middle, got close to the basket, and crossed the scoring zone within about 1.5 seconds of the ball, but was not predominantly ahead of the ball (distinguishing it fromrim_runner_ahead).rim_runner_other— the player ran down the middle but did not get very near the rim and is not classified as atrailer.trailer— the player stayed well behind the ball (more than about 1.5 seconds), or set a drag screen. This includes players who ran down the middle and also players who drifted laterally but not far enough to qualify as a wing runner.left_wing_runner— the player ran up the left side of the court.right_wing_runner— the player ran up the right side of the court.middle_to_right_runner— the player ran through the middle of the court toward the right side of the court.middle_to_left_runner— the player ran through the middle of the court toward the left side of the court.other— offensive cases that do not match any of the roles above after those rules are applied.
Previous Chance Carryover
was_shooter_on_previous_chance
Type: boolean | Nullable
true if this player was the shooter on the previous chance. null if there is no previous chance or the previous chance had no shot attempt.
was_rebounder_on_previous_chance
Type: boolean | Nullable
true if this player got the rebound on the previous chance. null if the chance didn't start with a rebound.
crashed_on_previous_chance_end
Type: boolean | Nullable
true if our data marked this player as positioning for an offensive rebound at the end of the previous chance. null if the previous chance didn't end in a real field-goal attempt (e.g. fouled shot, turnover, end of period) or the current chance didn't flow directly from that shot's outcome (e.g. an inbound after free throws).
watched_on_previous_chance_end
Type: boolean | Nullable
true if this player stood and watched during the shot at the end of the previous chance instead of running back or positioning for a rebound. null if the previous chance didn't end in a real field-goal attempt or the current chance didn't flow directly from that shot's outcome.
distance_traveled_between_previous_shot_start_and_chance_start
Type: float | Unit: feet | Nullable
How many feet did the player move from the start of the shot to the start of the next chance? This can be useful in combination with x_distance_traveled_between_shot_start_and_chance_start because a player who crashes in from the corner might have an x-distance traveled that is close to 0, but a high overall distance traveled. null if there is no previous chance, the previous chance had no shot attempt, or player coordinates are unavailable at the previous shot's start frame.
x_distance_traveled_between_shot_start_and_chance_start
Type: float | Unit: feet | Nullable
How many feet, along the x-axis, did the player move toward the opposite hoop from the start of the shot to the start of the next chance? A high positive value means the player moved much closer to the other rim during the shot (e.g. getting back on defense or leaking out), while a negative value means they moved toward the shooting hoop (e.g. crashing the glass). null if there is no previous chance, the previous chance had no shot attempt, or player coordinates are unavailable at the previous shot's start frame.
End-of-Transition Positioning
We attempt to estimate where the player ended their transition run by looking at when they stop moving or have a sharp change of direction or when the offense first runs an action. The fields below contain the coordinates and the region of where we estimate the player’s transition run ended.
transition_end_x
Type: float | Nullable
The player's x-coordinate at the estimated end of their transition run. null if no transition end position is available for this player on the chance.
transition_end_y
Type: float | Nullable
The player's y-coordinate at the estimated end of their transition run. null if no transition end position is available for this player on the chance.
transition_end_region
Type: string | Nullable
Court region at the estimated end of the player's transition run. Can be one of: backcourt, far, left corner three, left wing three, right wing three, middle three, right corner three, left corner two, left wing two, middle two, right wing two, right corner two, key, ra, out of bounds, other. null if no transition end position is available for this player on the chance or if the player is on defense.
Defender Pressing
defender_pressing_score
Type: float | Nullable
A score from 0 to 1 indicating how much this player applied backcourt pressure on this chance. Higher values indicate more pressure. Only populated for defensive players; null for offensive players.
is_defender_pressing
Type: boolean | Nullable
true if we determine that the player is attempting to defend in the backcourt (including off ball players) instead of getting back on defense. Some players we define as pressing may not have a high pressure score, but we think they are not getting back on defense as they normally would. So this should be used in combination with the pressure score to interpret how aggressively the player is pressing. Only populated for defensive players; null for offensive players.